Share
How to Install an SSL Certificate on Let's Encrypt for Lightsail WordPress
If you’re running a WordPress site on AWS Lightsail, securing your site with an SSL certificate is crucial. SSL (Secure Sockets Layer) encrypts the data exchanged between your website and its visitors, ensuring sensitive information remains protected. One of the easiest and most cost-effective ways to get an SSL certificate is by using Let’s Encrypt, a free, automated, and open certificate authority.
In this guide, we’ll walk you through installing an SSL certificate on your Lightsail WordPress instance using Let’s Encrypt and the Bitnami bncert tool. This method makes the process of adding SSL to your website simple and straightforward.
Why Install an SSL Certificate?
Before we dive into the steps, it’s important to understand why SSL is essential for your website:
- Security: SSL encrypts the data exchanged between the user’s browser and your website, ensuring sensitive information, such as login credentials, remains safe.
- Trust: Websites secured with SSL show a padlock icon in the browser’s address bar, indicating a secure connection, which builds trust with your visitors.
- SEO: Google prioritises secure websites in search engine rankings, so installing SSL can help boost your site’s visibility.
- Compliance: For e-commerce and other transactional sites, SSL is essential to comply with regulations like GDPR.
Pre-requisites
Before proceeding, make sure:
- You have a running WordPress instance on AWS Lightsail.
- Your domain name is properly pointed to your Lightsail instance.
- You can connect to your Lightsail instance via SSH.
Steps to Install Let’s Encrypt SSL on Lightsail WordPress
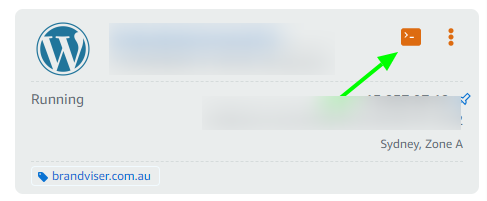
Step 1: Connect to Your Lightsail Instance
First, you need to connect to your Lightsail instance using SSH. You can do this directly from the AWS Lightsail console.
- Go to the Lightsail dashboard.
- Select your WordPress instance.
- Click on Connect using SSH.
This will open an SSH terminal window connected to your instance.
Step 2: Update the System Packages (optional)
Before installing anything, it’s a good idea to make sure your system packages are up-to-date.
Run the following command:
sudo apt-get update && sudo apt-get upgrade
Step 3: Run the Bitnami bncert Tool
Bitnami provides a simple tool called bncert to automate the installation of Let’s Encrypt SSL certificates. This tool will guide you through configuring HTTPS for your WordPress website.
To start the process, run the following command:
sudo /opt/bitnami/bncert-tool

Step 4: Follow the Prompts
When you run the bncert tool, you’ll be prompted to input the following information:
- Domain name(s): Enter the domain or subdomains you want to secure. For example, if your website is “mywebsite.com”, enter that.
- Redirection choices: You’ll be asked if you want to force HTTP to HTTPS redirection and whether to enable www to non-www redirection (or vice versa). It’s recommended to enable both for better security and SEO.
Here’s an example prompt flow:
- Domain:
mywebsite.com www.mywebsite.com - Force HTTPS redirection: Yes
- Enable www to non-www redirection: Yes
The tool will automatically obtain and configure the SSL certificate for your domain.
Step 5: Automatic Renewal Configuration
One of the great features of Let’s Encrypt certificates is that they are automatically renewed every 90 days. The Bitnami bncert tool sets up automatic renewal by default, so there’s no need for manual intervention.
Step 6: Test Your SSL Certificate
Once the process is complete, your SSL certificate should be installed and configured. To check if everything is working:
- Open your web browser and visit your site using
https://. - You should see a padlock icon in the browser’s address bar, indicating the SSL is active and your site is secure.
You can also use tools like SSL Labs’ SSL Test to verify your certificate and ensure everything is set up correctly.
Step 7: Restart Your Services
After installation, it’s good practice to restart your services to ensure all changes take effect. Run the following command:
This will restart the necessary services, including Apache, so your site can fully transition to HTTPS.
sudo /opt/bitnami/ctlscript.sh restart

Shivam Sagar
Digital Solutions For Small Businesses
Helping small and local businesses to grow online.
-
 How to Keep All Accordion Sections Expanded in Elementor by DefaultCode
 -
 How to Get 30 Leads in 30 Days for Your Automotive BusinessAutomotive
 -
How to Install an SSL Certificate on Let's Encrypt for Lightsail WordPressAWS
-
 What is SEO and How Does it Work for Local Businesses?Marketing
 -
 How to Play Audio with the Click of a Button on WordPress or Any WebsiteCode